ServiceNow Module
The ServiceNow Module provides a communication channel between ServiceNow and Resolve Actions Express. After you add and configure the module, Actions Express pulls new submitted ServiceNow records, translates them into incidents, and displays them in Actions Express LIVE. Records closed in the ServiceNow console trigger incident closure in Actions Express.
Prerequisites
The following provisions must be made before configuring the module.
User Access
The user of the integration module must have ServiceNow admin permissions or at minimum read access to the following ServiceNow tables and forms:
<target form>(such asincident,problem,change request, and so on)sys_choicesys_db_objectsys_dictionarysys_documentation(contains the human-readable labels and language information)sys_glide_object
For specific activity actions, additional permissions are required, from create (to create a new record using the ServiceNow Create Record activity) to write (to update an existing recording through the ServiceNow Update Record activity) as needed. Common actions with expected permissions are listed below, but should be reviewed with a ServiceNow administrator if additional permissions are required.
Uploading Attachment
sys_attachment_doc(create)sys_attachment(create)ecc_queue(create)
The module user must be able to create in the three tables: ecc_queue, sys_attachment (to associate with the <target form>), and sys_attachment_doc (to publish the file content).
For more information, see the ServiceNow support article on Creating attachments using Web Services.
Downloading Attachment
<target form>(such asincident,problem, and so on)sys_attachment_doc(read)sys_attachment(read)ecc_queue(read)
The module user must be able to query the <target form> for the sys_id of the record. Using the sys_id, you query the sys_attachment table to return the list of attachments currently associated with the <target form> (unless you know the expected file name). Then, sys_attachment_doc is queried to extract the file and its contents.
Populating reference field values with name in parent table for the three standard ServiceNow forms (incident, problem, and change request):
<target form>(incident,problem,change request)sys_user(read)—Used to translate user references: Caller, Assigned To, Opened by.sys_user_group(read)—Used to translate assignment group reference: Assignment group.cmdb_ci(read)—Used to translate a configuration item reference.
Authentication
The ServiceNow module can be used with two types of connection authentication to ServiceNow—Basic and OAuth. From a security standpoint, OAuth is the recommended mechanism, as it allows you to use ServiceNow activities in Actions Express without providing your password.
Server Clock Synchronization
The clock of the ServiceNow user account machine must be in sync with the clock on the machine where the module is running. Depending on the module mode (Local or Remote), this could be the main Actions Express machine or another machine.
Network Connectivity
Each Actions Express instance running a ServiceNow module must have external Internet access to the configured ServiceNow instance/URL. If required, you might also have to update the module configuration to connect via a proxy.
Installing the Module
Use the Actions Express installer to add the module. You can add it during a fresh installation, or later as an update.
Fresh Installation
Choose whether to install the module on the same machine as the main Actions Express services or on a separate machine.
Integrated Module Installation
Take these steps to install the module on the same machine as the main Actions Express application.
- Run the Actions Express installer and click Next.
- Accept the license agreement and click Next.
- Select an installation location and click Next.
- Select the installation type (Single Tenant or Multi Tenant) and click Next.
If you select Multi Tenant, you are prompted for an additional multi-tenant installation key. - On the Choose Installation type screen, select Create new Actions Express environment/Upgrade after uninstalling and click Next.
- On the Custom Setup screen, ensure that Integration Packs > Actions Express ServiceNow is marked for installation on the local hard drive.
- Click Next and complete the installation as usual.
Standalone Module Installation
Take these steps to install the module on a machine separate from the main Actions Express application.
- Run the Actions Express installer and click Next.
- Accept the license agreement and click Next.
- Select an installation location and click Next.
- Select the installation type (Single Tenant or Multi Tenant) and click Next.
If you select Multi Tenant, you are prompted for an additional multi-tenant installation key. - On the Choose Installation type screen, select Install standalone components and click Next.
- On the Custom Setup screen, ensure that all components are deselected except Integration Packs > Actions Express ServiceNow and then click Next.
- On the next screen, click Install and wait for the installation to complete.
- Click Finish to close the installation wizard.
Existing Installation
If you are already running Actions Express and you want to add the module, take the following steps:
- Run the Actions Express installer and click Next.
- On the Program Maintenance screen, click Modify and click Next.
- On the Custom Setup screen, expand Integration Packs and ensure that Actions Express ServiceNow is marked for installation on the local hard drive.
- Click Next.
- On the next screen, click Install and wait for the installation to complete.
- Click Finish to close the installation wizard.
Advanced Module Settings
Some module settings that are common between all modules and are rarely used can only be changed directly in the Resolve DB. See a subset of these settings.
Creating the Module Instance
You need to configure a module instance for each ServiceNow server that you want to integrate with.
- Go to Main Menu > Configuration > Modules.
- From the top right corner of Integrations, click +.
The module properties screen appears. - In the Name field, enter a name for the new module instance.
It is a good practice to provide a descriptive name to let you distinguish between multiple module instances of the same type. - (optional) In the Description field, enter a description for the module instance.
- From the Type field, select ServiceNow.
- In Mode, select where you want the module instance to run:
- Local—The module instance will run in your local deployment of Actions Express. This option is suitable for integration with services that run in the same network or cloud services that are accessible from the network.
- Remote—The module instance will run on the server where you installed the remote executor (installing a remote executor is needed when the server does not have access to the SQL DB). This option is suitable for integration with services that run in a separate network and are normally not accessible from the main network where Actions Express runs.
- Check Monitor if you want Actions Express to monitor the module instance.
By selecting this option, a new incident is created when the instance is down. - When you have one or more ServiceNow modules installed on remote machines, you can select to which remote ServiceNow module you want to connect. Select the device where the module instance is installed from Module Instance > Device, as well as the Port through which it will communicate.
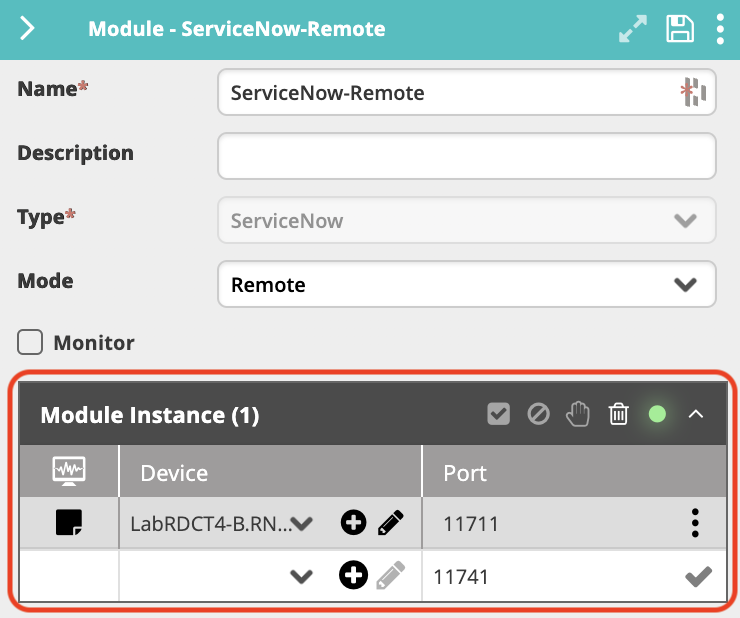
- If you haven't predefined a Device within Incident Configuration, you can click the plus icon to add a new Device directly from this screen. Enter a Name and an IP Address within the configuration, where the Name must be resolvable within DNS (FQDN) or IP Address.
- Click Save to create the module.
- In the Connection Parameters section, specify the ServiceNow server connection details:
- In the URL field, enter the URL of the ServiceNow instance.
- Select the authentication type to use:
- Basic to log in with a ServiceNow username and password.
- OAuth2 to log in with an OAuth authentication token.
- In the User name and Password fields, enter the credentials of the ServiceNow user account authorized to access the ServiceNow instance as described in User Access.
- (OAuth only) Enter the Client ID and Client Secret obtained from ServiceNow.
For more information, see Set up OAuth. - (Optional) Set up a proxy server for the connection:
- Check Use Proxy.
- In Proxy URL, enter the URL of the proxy server.
- In Proxy Username, enter the username of a proxy server user account if the server requires authentication.
- In Proxy Password, enter the password of the proxy user account.
- Click Test Connection to verify your connection with the server.
A valid connection is indicated with a green tick icon.
- Click Save again to complete this section of the configuration.
- In the Configuration Options section, specify additional generic module instance options:
- Log Level—Select how verbose you want the module-related log messages to be. Level 1 is the least verbose.
The log file is located in the module's installation folder (
C:\Program Files\Resolve\Actions Express ServiceNowby default).
- Log Level—Select how verbose you want the module-related log messages to be. Level 1 is the least verbose.
The log file is located in the module's installation folder (
- Click Save.
Proxy Settings
If accessing the ServiceNow instance requires a proxy server, the credentials must be configured at the Resolve DB level. On the SQL database hosting Actions Express, execute the following query:
SELECT TOP (1000) [Mnumber]
      ,[Mtype]
      ,[Mname]
      ,[Params]
  FROM [Ayehu].[dbo].[Modules]
A table of results similar to the following will be returned:

You can see that the value in the Mnumber column for this ServiceNow module is 9. To change the proxy URL (including port), username, and password settings for your module, execute the following three queries using your specific proxy information, including the correct value for Mnumber:
UPDATE [Ayehu].[dbo].[Modules]
set Params = replace([Params],'ProxyURL=""','ProxyURL="http://YOUR.PROXY.URL:PORT"')
where Mnumber = YOUR_MODULE_NUMBER
UPDATE [Ayehu].[dbo].[Modules]
set Params = replace([Params],'ProxyUserName=""','ProxyUserName="YOUR_USERNAME"')
where Mnumber = YOUR_MODULE_NUMBER
UPDATE [Ayehu].[dbo].[Modules]
set Params = replace([Params],'ProxyPassword=""','ProxyPassword="YOUR_PASSWORD"')
where Mnumber = YOUR_MODULE_NUMBER
Impact of the ServiceNow Proxy on the Module
There are two ways in which the ServiceNow proxy might impact the module:
Module appears to be down even though it is working correctly.
To confirm that the cause for this is the ServiceNow proxy, execute any ServiceNow activity and check if the output is received.When testing the module connection via the Test Connection button in the configuration panel, it fails with the error "Unable to connect ServiceNow" even though the module appears to be up.
Actions Express cannot connect to ServiceNow because the proxy is being used.
Selecting ServiceNow Records
Once the ServiceNow module has been fully configured, you can begin to import ServiceNow form information, as well as define filters and mapping options.
Click the expand icon (![]() ) in the module configuration screen.
) in the module configuration screen.
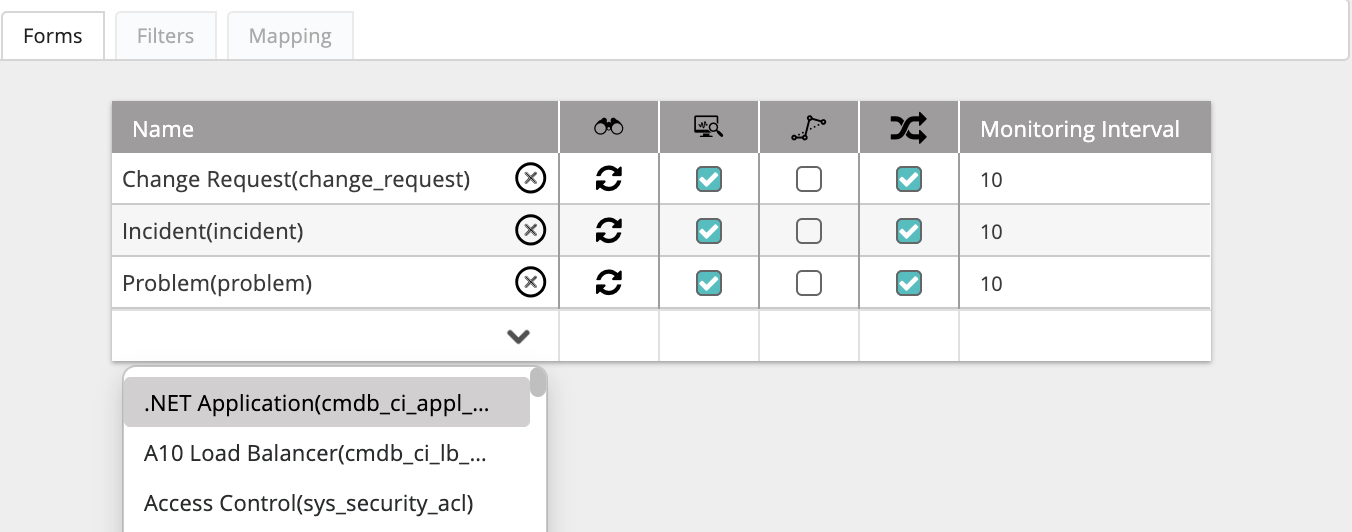
The Forms, Filters, and Mapping tabs appear, displaying the available ServiceNow forms and properties. Each form corresponds to a ServiceNow record such as a task or an incident.
New ServiceNow records are pulled into Actions Express according to the forms listed in the Forms tab and their defined filters. Records of forms that do not appear in the list are not pulled.
- To add a new form to the list, click in an empty row in the Name column and select it from the list of available forms.
- To discover all fields associated with the selected form, click the discover icon that appears next to its name after selecting it (
 ).
Once discovery is complete, the icon will change to circular arrows to indicate this.
).
Once discovery is complete, the icon will change to circular arrows to indicate this. - Check the box in the Monitoring column (
 ) if you want Actions Express to monitor data in this form and create events for detected ServiceNow updates.
 - Checking Bypass Incident (
 ) will process Actions Express events (records and updates) without creating incidents. Depending on your specific needs, this can be useful when the incoming information is not critical, and you simply want to use it in workflows.
 - Check Execute Workflow on Every Update (
 ) to run the corresponding workflow upon each update of the incident, or clear to run it only upon the first instance.
 - In a high-volume environment, we recommend setting the Monitoring Interval value between 30 and 60, meaning that Actions Express will check for ServiceNow updates every 30 to 60 seconds. By default, it is set to 10.
- Once you have configured the form, click Save to update the module settings.
Applying Filters
Filters determine which ServiceNow records will be discovered by Actions Express. To get all requests for a specific record, do not create any filters.
- While still in the Forms tab, click on the form you want to select.
- Click the Filters tab.
- In the Name column, enter the name of the filter you want to create and hit Enter or click the check mark. This name should be indicative of the criteria defining the filter.
- In the Filter Columns table:
- In the Name column, select one of the discovered ServiceNow record fields on which to base the filtering.
- In Relation, select the type of relationship you want in the filter. The possible values here will vary based on the selected relation type.note
Numeric value fields such as
_Severitycan only have anEquals/Not equalsrelation.Contains/Not containsis not supported. - In Value, choose the values you want to capture.
Mapping ServiceNow Properties
In the Mapping tab, you can translate ServiceNow properties into Actions Express incidents. The window is divided into three sections: Fields, Severity, and State.
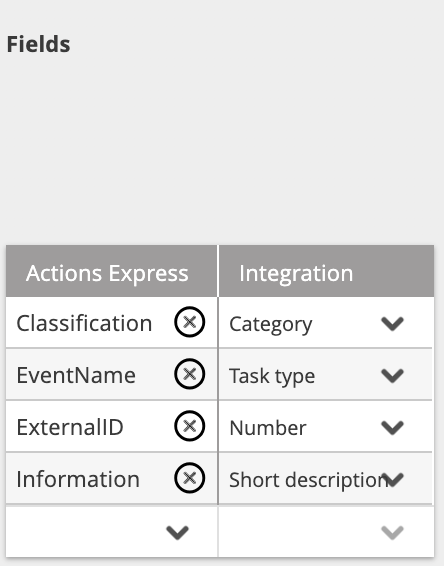
Fields
In this section, you can translate ServiceNow properties into Actions Express variables. The ServiceNow properties list (the drop-down in each row of the Integration column) is updated automatically based on the discovery completed in the Forms tab.
Field lables must NOT contain a colon : sign. The field will not map when a colon is present in the label. Please remove the colon from the label before proceeding.
To remove a field, click the X icon next to its name. To add a new field, click the down arrow in the empty row.
Severity
In this section, you can translate ServiceNow severity into Actions Express severity. There are two options for severity selection:
- Static Severity—All records of the specified form open an Actions Express incident with the selected static severity.
- Customized Severity—Enables you to map the values of a specified field of the ServiceNow record against the Actions Express severity. The possible fields in this category are all fields in the specific record that are part of a list (drop-down list/radio buttons).
An Actions Express severity can be mapped into several ServiceNow severity values. For example, if you want all ServiceNow severity values of 1 to be opened as Critical incidents in Actions Express, check the "1 - High" option in the Integration Severity field:
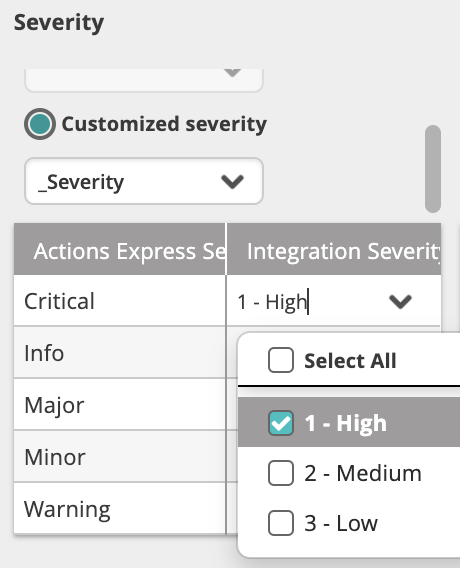
You can also type values manually instead of selecting them from the drop-down menu. The manually entered values must exist in the drop-down list and are case-sensitive.
State
In this section, you can translate ServiceNow states into Actions Express states. There are two options for state selection:
- Static State—All records of the specified form open an Actions Express incident with the selected static state.note
When using a static state, closing the request in ServiceNow does not close the Actions Express incident, and vice versa.
- Customized State—Records of the specified form open an Actions Express incident according to the selected form field and its values. The possible fields in this category are all fields in the specified form that are part of a list (drop-down list/radio buttons).
An Actions Express state can be mapped into several ServiceNow states. For example, if you want all New and In Progress ServiceNow records to be opened as Down incidents in Actions Express, check the "New" and "In Progress" options in the ServiceNow Integration State field or type them in manually.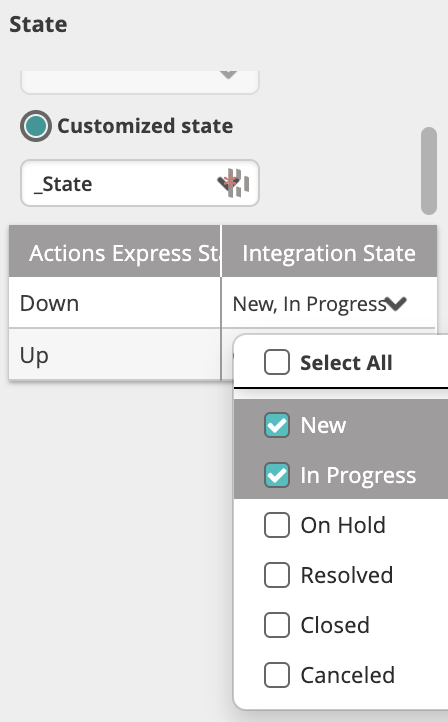
When more than one mapping option is selected for the Up state, closing the incident in the Actions Express LIVE Dashboard changes the selected property to the first option in the list.
Using ServiceNow Variables
In the ServiceNow module, related variables are discovered in Actions Express and can be used to define conditions or to configure an activity.
Because some integration variable names (such as Source, State, and Severity) are reserved words in Actions Express, they display with an added underscore (for example, _Severity). Keep the underscore when referencing such variables in an activity (for example, %_Severity%).
In a Condition
To use ServiceNow variables in a condition:
- In the Main Menu > Repository > General > Conditions list, click the condition name and open its configuration panel on the right.
- In the Type column, select the name of the ServiceNow module from the list.
- In the Module Form column, select the relevant form name to discover its fields. You can add as many form entries as needed.
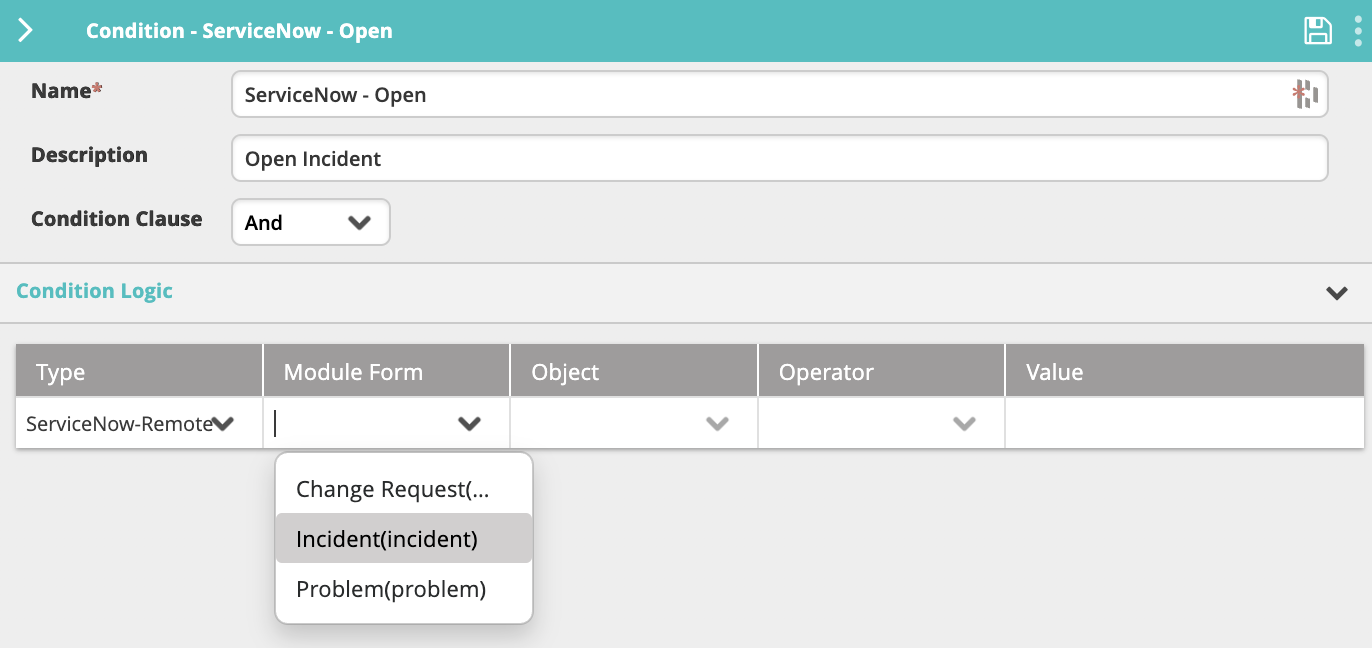 All imported ServiceNow variables will appear in the Object list.
- If you add the form to the condition and the Condition Clause field is set to "And", only fields from the specified form will match the condition.
In an Activity
To use ServiceNow variables in an activity:
- In the Main Menu > Builder > Workflow Designer, open the activity settings.
- In the desired field, type
%. This will open the variable menu. - You can either continue to type the variable name if you know it, or click on the Modules tab, find the ServiceNow module and select the variable you want to use.

Troubleshooting
Use this information to resolve common issues that may occur with this integration module.
Module Is Down
If the ServiceNow module is down, open its configuration window from the Main Menu > Configuration > Modules and click Test Connection.
- If the test is successful: Verify that the Modules section of your license contains "ServiceNow".
- If the test fails: Continue troubleshooting according to the next sections.
Module Is Not Pulling New Events
If the module is in Up state but no new alerts are being pulled:
- Verify that the specified form was added to the Forms tab of the module configuration.
- In the form that the module is listening to, verify that label names are not duplicated.
New Events from ServiceNow Are Not Mapped to Actions Express Incidents
If you see new events in the Actions Express Audit Trail but no new incidents are created in the Actions Express Live dashboard:
- Verify that all ServiceNow fields required for the mapping in the module configuration's Mapping tab are sent with data from ServiceNow and aren't sent empty. To do this, open the ServiceNow log located under
C:\Program Files\Actions Express\Actions Express ServiceNow Server\<tenant-name>\<instance-name>\Logsand search for the incoming messages.
Test Connection Failure
Error: "Could not connect to net.tcp://ServerName: 11020./ The connection attempt lasted for a time span ...".
where [ServerName] is the device you have listed in the general settings configuration.
- Probable cause and resolution: The ServiceNow module is not installed on [ServerName], or the service is not running. If the specified server is incorrect, select the correct server where the component is installed. If the server name is correct, start the service (or restart it if it is already started). If the service doesn't exist, install it on the selected server.
Error: "The remote name could not be resolved".
- Probable cause and resolution: Verify that the URL you have provided is correct and reachable from the Actions Express server.
Error: "Unable to connect ServiceNow The underlying connection was closed: Could not establish trust relationship for the SSL/TLS secure channel”.
- Probable cause and resolution: Actions Express server is missing an Entrust certificate. Download and install Entrust.net Certificate Authority (2048).
Error: "The request failed with HTTP status 401: Unauthorized"
- Probable cause and resolution: Verify that the username and password you have provided are valid and have sufficient permissions to log in to ServiceNow.
Activities: Create Record, Update Record, Get Record
Error: Activity returns "Unable to communicate with ServiceNow Module" error.
- Probable cause and resolution: The ServiceNow module is in status Down. Check Troubleshooting section Module is Down.